IIS Tutorial Series (Part 1): Installing FastCGI and PHP for IIS 6.0
Note: This article is Part 1 of the IIS Tutorial Series.
Despite IIS 7.5 being the current stable IIS release, it is only available for servers running Windows Server 2008. However for the many of us who are still running Windows Server 2003 or Windows XP, IIS 6.0 is our only option. And many of us are still limited to that option.
In this tutorial I will be doing a walkthrough on installing FastCGI and PHP. For those who are a bit new to PHP on IIS, here’s a general view of what happens when a PHP page is call through the client’s web browser:
When the client requests a PHP resource (.php), IIS responds by calling FastCGI. FastCGI is the interface to CGI Programs (in this case, PHP), so the web server can focus on web page requests. FastCGI is then responsible for calling the PHP executable to execute the PHP script, and return its response back to IIS. IIS then returns that response back to the client.
Installing FastCGI
With the stable release of PHP 5.3 out for a while now, the only way to install PHP 5.3 on IIS is through a CGI Handler. PHP 5.2 and earlier allowed us to run PHP using ISAPI, but that option has been deprecated. For those of us intending to move forward, we would have to use CGI from now on. We’ll go over installing the FastCGI handler on IIS 6.0.
You can download FastCGI for IIS 6.0 here (version 1.5 as of this time).
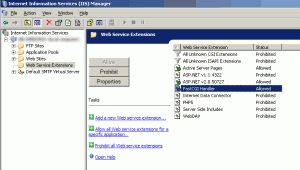
Run the executable on the web server to install FastCGI. You may have to restart your machine for the installation to complete. When that’s done, open up IIS Manager and view the list of Web Service Extensions on the server tree. There should be a “FastCGI Handler” extension in the list. Make sure its status is set to Allowed. And that’s it. FastCGI is installed!
Installing PHP
Download the latest version of PHP for Windows here.
We’ll be doing the manual method of installation, so download the ZIP version and which is Non Thread Safe. It’s completely up to you whether you want to use the PHP 5.2 series or the PHP 5.3 series. Some applications may work on PHP 5.2 but not 5.3. Either one, the installation process is the same.
Unzip the content to somewhere on your server. I prefer the base of the C drive: C:\php\
Rename the “php.ini-recommended” (or “php.ini-production” or “php.ini-development”, depending on the version of PHP) file to the name “php.ini” and make any adjustments to that configuration file. (I won’t go over that in this tutorial.) You can do this at a later time if you wish. Just like that, PHP is technically “installed” on your server.
Making PHP work
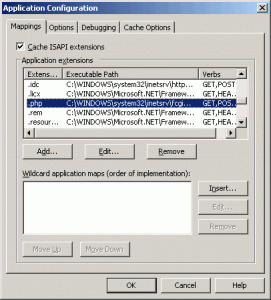
Now, it’s time to make IIS understand what to do with requests that have the .php extension. When IIS hear a .php file called, we want it to let FastCGI know, so FastCGI can call PHP. To do so, we’ll have to set up the extension mapping for .php. Open up IIS Manager again and navigate to “Web Sites”. Right-click on it and select “Properties”. Select the “Home Directory” tab, and within it, select “Configuration…” A new window pops up with a listing of Application Extensions.
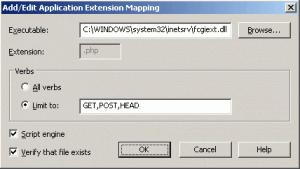
Look for the .php extension and “Edit…” it. If it doesn’t exist, “Add…” the extension. A new windows pops up. For Executable, look for the FastCGI library. For most default installs, it should be under: C:\WINDOWS\system32\inetsrv\fcgiext.dll
For Verbs, limit it to: GET,POST,HEAD
Save all options.
IIS can request the FastCGI Executable when a .php resource is requested. Now, it’s time for FastCGI to talk to PHP by modifying FastCGI’s configuration file. For default installs, the config file should be located at: C:\WINDOWS\system32\inetsrv\fcgiext.ini
Open it in a text editor and add the following at the bottom:
[Types]
php=PHP

[PHP]
ExePath=c:\php\php-cgi.exe
The Types is the extensions it’s listening to and the corresponding configuration it will use. So here a “php” extention will use the [PHP] configuration. The [PHP] configuration has the path to PHP’s CGI executable. This is how FastCGI knows where to find PHP. Modify the path to where PHP is located on your server.
There are more options you can add, but this should get you going.
Testing the Installation
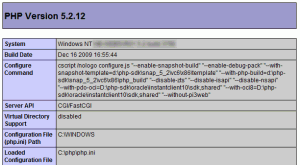
Test that the installation went successfully. Restart IIS and create a website hosting a PHP file and output phpinfo(). If everything went well, you should see the PHP Info page with hints of FastCGI being used in there.
Note: When I was doing this, I’ve also experienced a FastCGI error during this last step stating that “Access is denied”. I’m not sure if this is common, but I was able to fix the issue by adjusting the security permissions on the PHP installation folder. I make sure that the users: Administrators, NETWORK SERVICE and SYSTEM are listed. If not, add them, restart IIS, and try to load the PHP page again.


I spent 2 full days with other tutorials trying to get this to work, and then I found yours (nobody else mentioned the FastCGI requirement). Thanks for helping me finally get it!
No problem! Glad it did help somebody. It was a real pain in the butt for me too.
Exact same situation! Thanks for the tutorial!
You’re welcome, Patrick!
Great Tutorial Jimmy! Keep posting you tutorial series it has been very helpful.
Sunil,
Thanks for your feedback!
Thanks so much Jimmy! Out of all the information online, yours was simple and WORKED!
Julie,
Thanks for your wonderful comment. I’m glad that it was simple to understand!
Hi Jimmy, thanks for such a great and well explained tutorial!!!
i just have one problem… i can’t find the php.ini configuration file, it’s supposed that it has to be in the C:\WINDOWS\ folder, but it’s not there :S, where i can find it? can u help me please :S
I recently know that the php.ini file in versions 5.3 or above, are called
“php.ini-production” and “php.ini-development”, so one of them need to be changed to php.ini or something like that, thanks for your help
Berna,
Thanks for the comments! That’s great you were able to get the php.ini. You’re right, it is named differently in PHP 5.3. I’ve updated the tutorial to specify the different names also.
Jimmy thanks for the easy tutorial but for some reason my PHP install didn’t work.
I have been following other tutorials from 2 days until I ran accross yours. Then I followed the instructions but php page cannot be displayed. IIS 6 is working becauset a simple html page loads fine.
I installed it on Windows Server 2003 SP2.
Sarfaraz,
Just checking, does it say that it does not display (like a browser’s 404 error page), or is it a FastCGI error?
If you’re still around, we can try to step through each installation step to make sure it was done properly.
I got it working.
This helped me configure my php.ini file. Very good tutorial
http://www.youtube.com/watch?v=ANRpnDMsGcQ&feature=BF&list=ULDnt2wZf1Cuk&index=4
That’s great!
The YouTube series looks like a great tutorial resource. Definitely makes things much easier when you can watch someone do it.
My php.ini file needed configured and I had a wrong path in IIS Extension Manager for php.
This video tutorial helped me.
http://www.youtube.com/watch?v=ANRpnDMsGcQ&feature=BF&list=ULDnt2wZf1Cuk&index=4
@Jimmy
Jimmy,
I too spent 3 days trying to get this to work. Everyone said to use isapi not fastcgi. Your tutorial finally got it working. most tutorials said to change the cgi_redirect option in the php.ini to 0. Is this still neccessary?
in any event Thanks so much. Your The Man!
Leon,
You’re welcome! Definitely you have to use FastCGI for PHP5.3+ on Windows.
As for the cgi_redirect, I’m not sure what that is, and I don’t see that in php.ini anywhere. In any case, since you got everything working already, whatever and wherever it is, just don’t touch it.
Jimmy,
thanks for the good tutorial. In my scenario I don´t find the fcgiext.ini on my server. Has the filename been changed? I would be happy to get some advice. Thanks in advance.
Michael
Michael,
It should be at %windir%\system32\inetsrv.
In that directory, do you also have the other files, fcgiext.dll and fcgiconfig.js?
If not, maybe FastCGI wasn’t installed correctly.
Thanks a lot! I’ve also spent days looking for the solution on this one!
So thanks to your article I can finally find some peace of mind!
Ronny
Ronny,
That’s great! I’m glad to be of help!
This helped a lot. Thanks!
great, it help me to upgrade my php for iis 6.0.